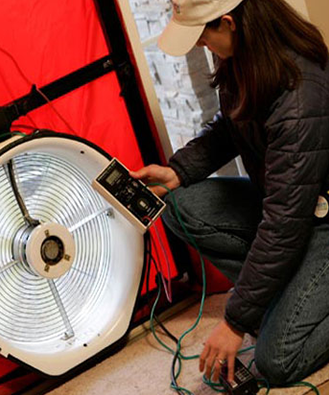
Air Tightness Test
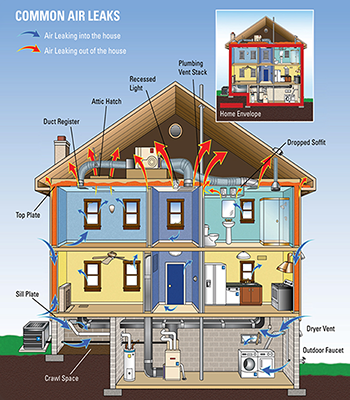
Having your home properly air sealed is critical to your energy conservation efforts and greatly impacts your utility bills. You can save up to 30% of your energy costs by air sealing multiple points of your home where energy losses occur. Additionally, air leaks are also a major cause of discomfort, moisture problems and even poor air quality.
Where Air Leakage Occurs:
The US Department of Energy shows how much air leakage occurs in various locations of an average American home:
- Ceiling, Walls and Floors – 31%
- Ducts – 15%
- Fireplace – 14%
- Plumbing Penetrations – 13%
- Doors – 11%
- Windows – 10%
- Fans and Vents – 4%
- Electrical Outlets – 2%
These figures provide you with the most important areas to target for air sealing. However, a home energy audit will pinpoint the exact locations of air loss and assess your entire home’s energy consumption and waste, and recommend ways to improve your home’s energy efficiency.

Exterior of Your Home
The exterior of your home is often referred to as the “envelope” or the “shell”. Sealing your home against air infiltration (air leaking in from the outside) and air ex-filtration (air leaking from inside of the house to the outside) helps to reduce your energy expenditures.
As a builder or homeowner, you can greatly improve your home’s energy efficiency by sealing as many entry points as possible. Check seams between the top of the foundation wall and the wood framing, doors and windows, along baseboards, through electrical receptacles and switches mounted on exterior walls, fireplaces, laundry chutes, attic hatchway doors and pull-down stairs, whole-house fan installations and pipe and wire penetrations.

Interior of Your Home
To ensure that air doesn’t leak from the outside of your home to the inside, check the following:
Baseboards and Floors
Any gaps left between baseboards and hard floors can be filled with latex caulk.
Gaskets
Check switches and electrical outlets – they may feel cold or you may feel a cold draft. You can block these drafts from the inside of your house by installing inexpensive insulated gaskets or air sealing with foam. (Caution: to avoid electrical shock, remove the covers from switches and receptacles only after you have shut off the power.)
Recessed Ceiling Lights
On new construction always use IC-Rated recessed lighting. This allows for insulation to cover the gasketed unit. Older types of recessed lighting can be extremely leaky and difficult to make airtight. Often, the best solution is to build an airtight box of flame-resistant material (i.e. sheet metal or drywall) at least 3 inches larger the light’s housing to cover the portion of the fixture that is in the attic. You will need to pay attention to fire code regulations.
Attic Floor
The top floor ceiling in your home acts as a containment barrier to rising warm air. Any small hole or a gap in that area will create an outlet for warm air to escape. As the air exits through the top floor ceiling, it will create a slight negative pressure inside your house and the air leaving will need to be replaced. That air will come from the outside of the house and will need to be heated –requiring additional use of your furnace, which costs you money. Checking for cracks, holes of small openings in the attic floor will result in substantial energy savings.
Attic
Sealing and insulating your attic is one of the most critical steps to ensuring that your home is properly air sealed. Most attics have insulation which helps reduce heat loss. But it won’t stop the air flow. Insulation can actually conceal cracks, gaps and holes through which the pressurized air from your home is driven into the attic. Check for staining in the insulation, which is an indicator of an air leak.
